 I had a couple people ask for directions on how to recover dining room chairs so I took pictures when I did mine last weekend.
Supplies needed:
- Batting if needed (available at fabric stores)
- Fabric
- Scissors
- Screwdriver (regular or power)
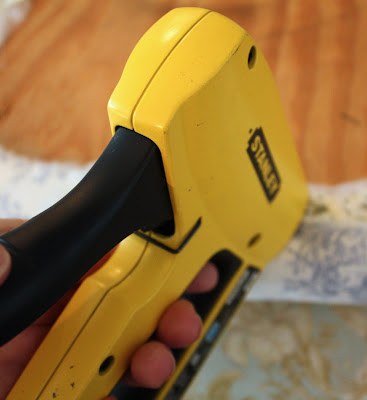
- Staple Gun
- Hammer
These instructions are for the dining room chairs I have pictured above. It's the type of chair that has a removable seat cushion. There is also a type of chair where the fabric is stapled directly to the side of the chair, and I'll show you that at the bottom of this post.


- Next, get your fabric ready. Iron it if needed.
- You want to cut your fabric so it's large enough to wrap over and under the seat with a couple inches extra. As you can see below, I'm putting my fabric directly over the fabric that was already on the chair. If you are taking everything off down to the foam you may want to use some batting. It looks better if you put the batting on and not just the fabric over the foam. The batting will give it a smoother look. Use the instructions below for applying the batting.

- Lay your fabric face down and place the chair cushion face down on top of it. Make sure if you have a one-way pattern that you have it going it the right direction! You are going to start with stapling the sides. Pull one side up and staple, then directly across from it pull the other side up and staple it. You want to pull it taunt but not too tight or it will disort the fabric. Do the same for the other sides. If your staple doesn't go all the way in you can finish off with a slam of the hammer!
 Next you want to work on the corners. If the corner is square you want to pull the corner up and staple it and then pull the sides up and staple...similar to making a bed.
 If your corner is more rounded you want to ease the fabric around and pull up and staple (see below). Be careful not to cover the screw holes so you can get it back on the chair!
 Then you want to work your way around and staple the fabric down all around. Turn it over every once in awhile to make sure you aren't pulling it too tight.
 Then trim away the excess fabric.
 Now just screw the top back on the chair and you are finished!
 That is the easy type of chair to recover. Now, if you have the type below, which usually has either nail heads or some type of decorative trim around it, it usually means it doesn't have a removable seat. That makes it harder to recover.
  I recovered this one by using instructions I found in a book called Singer Upholstery Basics Plus: Complete Step-by-Step Photo Guide . It's not quite as easy as the steps above but not too hard either. Sorry, I didn't take photos when I recovered this one so I can't share my step by step instructions with you.


27 comments:
Cindy,
Good job! One thing it is good to have tools to work with. They may cost you a little bit but they will pay for themselves over and over. Worth the investment and you can get them a little at a time if needed. On yesterdays post one lady ask about the shell mirror and what adhesive to use. I wouldn't use liquid nails! First of all it is brown and would look ugly. I used my glue gun and they have stayed good for over 10 years. I gave the instructions on how I made mine in the post comments on your inspiration room with the blue toile and shell mirror. If she wants to go back and look at it, I hope it will help her.
Sandy
Great job on the chairs. We found the web. site and love it.
That doesn't look all too complicated:) I'll be on the lookout for some chairs at yard sales this summer.
Thanks,
Karin
Hi Cindy...
Thank you so much for doing a tutorial on the "how to's" of covering a chair! I just love that pretty blue & white toile fabric that you chose for your dining room chairs...it's absolutely gorgeous with the rest of your home's decor!!! You have one of the most beautiful homes that I've ever laid my eyes on...you're such a talented lady!!!
Thank you so much for sharing your fabulous home with us...
Warmest wishes,
Chari
Ahhh toile! Your home is so lovely!! My dining room set is cherry, but I love how the white looks! My brother just gave away my Mother's fruitwood set with cane backs and I want to cry! I did not have the vision to see it it a creamy white and I guess I didn't have the room...not that I was offered it! I think I would have found room had I noticed yours!
~Nancy
Hmmm I actually like both versions of that one chair - the leather look and the fabric redo.
Great tutorial Cindy! Now I need to get everything together and recover my 6 chairs. ☺ Diane
Cindy
Thank you so much for the tutorial. I am going to try it on the 2 chairs that i bought at the good will store. Your chairs turned out just beautiful. Thanks for the inspiration.
Dianne
Good tutorial Cindy. I know it bugs me when someones corners look messy, not that I am perfect at it but that is the hard part of doing it.
Linda
Hi Cindy - thank you a wonderful blog and post today. I want to recover my chairs and I have a full size sheet, do you think this would be too thin?
I love your place - you have a real gift!
Terry, I think a sheet may be too thin. If you have enough you may try doubling the it, that might work better.
I love your chairs in the toile. Thank you for the step by step instructions.
Carolyn
Hi Cindy,
I just love your chairs recovered! Tha fabric is awesome! I had recovered my dining room chairs to match my dishes and then I went and gave the dishes to my little sister. "She aint gettin' the chairs"! LOL Anyway now I have to recover them to match my new dining room. I think that I will use the fabric that I have on there to make something for her dining room but I don't know what it will be because I can't do her chairs with it. She has six chairs and I only have four. Maybe I can make her some placemats or something. Any ideas? The dishes are on one of my posts. I just gave her some more pieces this past Saturday...so you will be able to find it easy. The fabric is just like them. The maker is Raymond Waites.
Hugs,
Lee Laurie
Thanks Cindy for the tutorial. I will be working on some chairs soon. Every little bit of info helps.
Take care.
Toodles.
BTW Cindy, my gazebo is done except for the priming & painting and one bit of that decorating surprise. I'm so excited. I gonna try to do it this weekend, and get my photos posted soon. This gazebo has consumed most of my time, but it was all well worth it.
Thanks so much.
Lisa
thanks for the post
i do learn how now..
I just love your "can do" spirit ~ and it seems you can do anything you set your mind to. I am especially impressed with the chair that did not have the removable bottom. Beautiful overall transformation on that one!
You're home is beautiful! It's amazing what you can do with a little fabric, paint and staple gun and it's easy.
Have a great day,
Jen
The chairs look beautiful Cindy! Great job!!
Hi Cindy! Another wonderful project. I LOVE the new fabric!! I have dining room chairs that need attention too, so I think I might give this project a try...you made it look easy with your great directions....and I admire your "big girl" tools too!!! You are just like a professional! Have a wonderful weekend ~ xo Joy
You did a wonderful job Cindy... the chairs look great!
WOW! I've been sometime watching your blog, and it's amazing! I like so much the things you do, all your job.. I'll follow your creations
Lovely things
That looks great! Spacify offers wide range of Wood Dining Room Chairs for your modern dining room.
А! Vielen Dank für diesen wunderbaren Beitrag. Bewundern Sie die Zeit und Mühe, die Sie in Ihrem Blog und detaillierte Informationen bieten.
Just thought I would comment and say great theme, did you code it for yourself? Really looks excellent!.
Hi there, I found your blog via Google while searching for first aid for a heart attack and your post looks very interesting for me.
Post a Comment